An online artwork check is integrated in the ordering process.
This tool automatically verifies whether both the die-cutting line and the label size have been set up correctly
Depending on the result, the online artwork check reports the following errors:
 The uploaded artwork has no bleed or the bleed is set up incorrectly. The bleed is the area that you have to add to the trim area of your label. This is necessary in order to compensate for machine movements and prevents white edges from appearing on the finished label. Your file has therefore been created on the ordered size, but without a 2.5 mm bleed all around.
 Please edit the artwork and add 2.5 mm bleed all around the trim area.
For example: If your label is to be 100 x 100 mm, the final file must be 105 x 105 mm including the bleed. Image elements that extend beyond the label edge should continue in the bleed to prevent white edges.
For more details on how to set up the bleed, please refer to our tutorial.
The uploaded file size differs from the ordered size. The artwork must be the actual size of your label plus 2.5 mm bleed on each side. It is important that the bleed is defined in the document: it will not suffice to increase the artboard’s width and height.
 For example: If you want a 100 × 100 mm label, the artboard must be created in its final size (100×100) and 2.5 mm bleed area must be set up on each side. The size of the resulting artwork must therefore be 105×105 mm.
The cutting line is missing or has not been created correctly in the uploaded printing file.
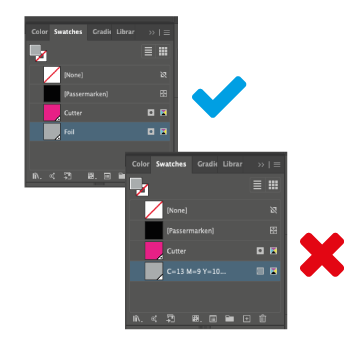
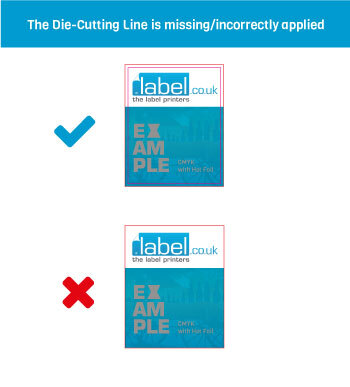 The die-cutting line must correspond to the actual shape and size of your label and it must be created as a Spot Colour with the name ‘Cutter’; furthermore, the cutting line must be set to overprint. Finally, the cutting line must be created as a path/stroke and not as a fill.
For more details about setting up the cutting line, please refer to our tutorial.
The cutting line in the uploaded printing file has a gap. If the die-cutting line was created as a combination of lines or shapes, these must necessarily be connected to form a closed path.
We recommend using the Pathfinder Tool in Adobe Illustrator to join the different shapes.
In Addition to the above, the Following Common Errors May Cause a Delay in Production and/or Require further Action:
Individual elements of the text are in the bleed and therefore outside the label. Please edit your file and make sure that all elements are within the trim area and that the necessary safety margin of 2 mm all around is maintained.
The safety margin is an imaginary line within your graphic. This ensures that all graphic elements that are not to be cut are printed correctly and are not accidentally trimmed. To ensure optimal printing, we require a safety margin of 2 mm from the cutting line.
Please ensure that cutting lines and frames have a minimum thickness of 2 mm so that we can guarantee an even die-cut.
The various label designs in the order have not been assigned correctly. Please use the link in the email you received to re-upload the print files and name each design clearly.
For example: if variety 1 is called “Apple” and variety 2 “Peach“, please name the PDF corresponding to variety 1 “Apple” and that of variety 2 “Peach“.
The uploaded files contain low-resolution, non-vectorised images and/or text. This unfortunately precludes a high-quality print result. Please use images with a minimum resolution of 250 dpi and vectorise all text elements. We recommend using a vector-graphic programme such as Adobe Illustrator or InDesign for this.
You have ordered labels with black as the only print colour. However, your files were created in CMYK. Please set the colour as 100% black (C=0, M=0, Y=0, K=100). If you have set black in four-colour in your file to make it darker, we would like to point out that in digital printing we also have the possibility of printing black twice (“Double-Hit“). This way we achieve the best results with black and produce a particularly rich black.
Please contact our customer service, we will be happy to activate the “Double-Hit Black” function for you.
The die-cutting line in your file is created in CMYK. This means that it is part of the artwork and it would be printed.
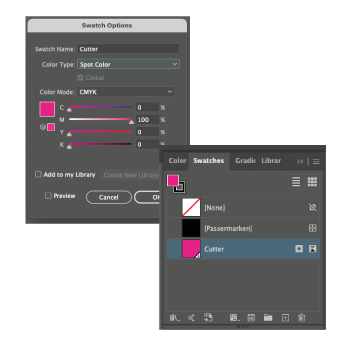 To prevent this, the cutting line must be set up as a spot colour with the name “Cutter”. It must be placed over all the CMYK elements and set to overprint.
For more details on how to create the die-cutting line, please refer to our tutorial.
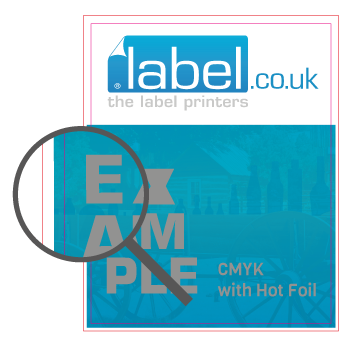
You have ordered labels with hot foil stamping. However, we have noticed that no hot foil elements have been created in your file. Hot foil must be set up as a spot colour called ”Foil”. It must be positioned over the CMYK elements and set to overprint. Have you ordered hot foil stamping by mistake and do not want to have hot foiled elements in your label? Then please contact our customer service team.
For more details on how to set up hot foil stamping, please refer to our tutorial.
You have ordered labels with hot foil stamping. However, we have noticed that the hot foil elements have not been set up correctly in your file. Hot foil must be created as a spot colour with the name ”Foil”, positioned over the CMYK elements and set to overprint.
For more details on how to set up hot foil stamping, please refer to our tutorial.
You have ordered labels with opaque white, but no opaque white elements are included in your printing file.
Opaque white must be created as a spot colour with the name “HPI-White” and positioned over all the CMYK elements.
 Please make sure that all elements that are to be seen as white in the label are not set to overprint: only the elements that are to be used as white base for the CMYK print must be set to overprint.
Have you ordered opaque white by mistake and do not want to have opaque white elements in your label? then please contact our customer services team.
For more details about setting up opaque white, please refer to our tutorials.
You have ordered labels with opaque white, but it is not set up correctly in your print file. Opaque white must be created as a spot colour with the name “HPI-White” and positioned over all the CMYK elements.
Please make sure that all elements that are to be seen as white in the label are not set to overprint: only the elements that are to be used as white base for the CMYK print must be set to overprint.
Have you ordered opaque white by mistake and do not want to have opaque white elements in your label? then please contact our customer service team.
For more details about setting up opaque white, please refer to our tutorials page.
The uploaded files contain spot colours that cannot be printed. We can only reproduce Pantone C-colours and Pantone U-colours and not colors such as metallic Pantone or fluorescent Pantone.
You are welcome to provide us with the four-colour file and we will try to get as close as possible to the desired original Pantone colour. In this case, we recommend that you enter a comment in the “Comment about this job for our team” field indicating the Pantone shade to be simulated.