To ensure that your order is processed as smoothly as possible, please follow the instructions below. Professional print data that meets our requirements can be created using graphics programs such as Adobe Illustrator, InDesign or ArtPro.
Not sure if your data is set up correctly? No problem! We’ll take care of your files! With our artwork services, you can choose between our Smart (from £30 plus VAT) or Professional (from £65 plus VAT) correction packages, depending on the scope of your project. What do you need to do? Select a correction package and upload your print data. We’ll take care of the rest! Our graphics team will check and correct your print data. You will receive a report detailing the errors and corrections made for your review. Go to the artwork services now.
Overview: The Most Important Information
File format: PDF
Colour space: CMYK
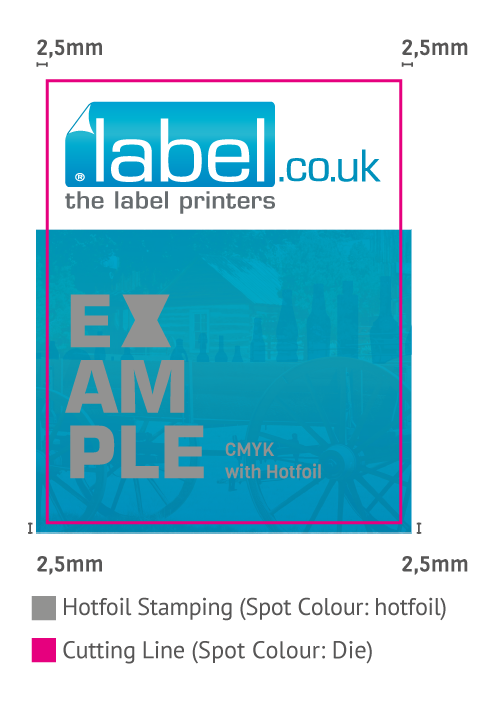
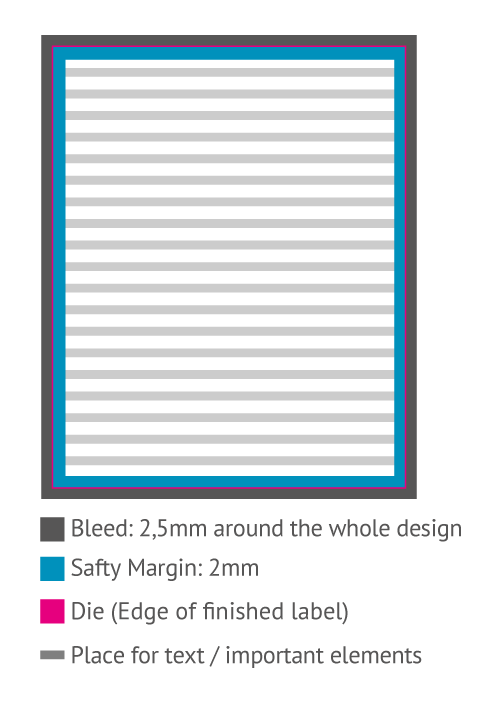
Bleed: 2.5 mm all around
Safety margin inside: 2 mm → Due to production reasons, there may be slight fluctuations in the die cut.
Data created in final format
Fonts converted to paths
Minimum resolution: 250 dpi
Standard resolution for images: 300 dpi
Standard resolution for line art: 1,200 dpi
Font size: at least 7 pt or 1.2 mm (measured by the size of a small ‘x’)
Font colour: high contrast to the background → fonts in grey or white and fonts that are too small may appear blurred.
Our tip: Print out your design at home to test it. This will allow you to see whether all fonts and elements are clearly legible.
Print Data Creation
Programmes for Creating Data
For creating professional data, we recommend Adobe InDesign and Illustrator, for example.
Creating Print Data with Adobe Programmes
In the print output PDF/X-1a: select 2003 (or high-quality print), bleed 2.5 mm (around the entire format). From the created cutting line to the first element to be printed, 2 mm space is required all around for printing reasons. Other information such as registration marks, crop marks, control strips etc. are not required. All layers must be included in the final print file. This means that all “special layers” such as hot foil, HPI-white or cutting lines are included in the printable PDF. They must not be sent separately.
Final Format
The print data must be created in the final format, plus 2.5 mm bleed all around. The bleed does not need to be specified during the ordering process; it will be automatically included later.
Artwork
The artboard defines the print area and must be created in the final format. In addition, a 2.5 mm bleed must be set all around in the document settings. To save the bleed in the PDF, check the box Use document bleed settings* under Marks and bleed*. (*in Adobe Illustrator)
Cutting Line
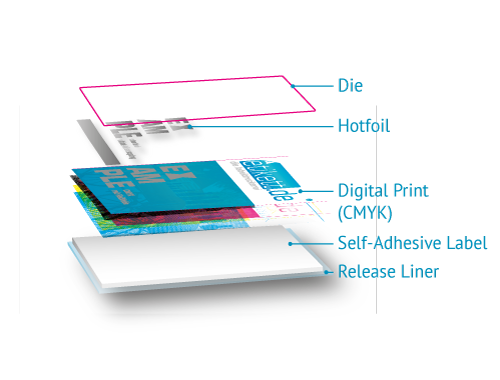
The cutting line (min. 0.2 mm line width) must be created in the PDF as a spot colour with the name ‘cutter’ and set to ‘Overprint’. The die cut can be made around the label or inside it. For internal die cuts, please contact our customer service team. Please note: Rectangular labels are die cut with a corner radius of 0.5 mm as a standard. Anything larger than this must be created by the customer as a separate shape with its own die-cut contour.
Special (Pantone®) Colours
Please set special colours as spot colours in the file, as we will not be able to consider them otherwise. The special colour must be named using the original Pantone® designation. Please note that we only accept original Pantone colours from the Coated (Pantone® C) and Uncoated (Pantone® U) ranges. Please specify this in the printing file as a spot colour with the official Pantone® colour name.
By default, all orders at label.co.uk are printed in the four-colour model (CMYK). If Pantone® colours are specified, these will be simulated as best as possible. Depending on the colour tone, it is possible to use orange, violet and green in addition to achieve the original tone as accurately as possible. Please note that there is generally no 1:1 match and not all colours can be simulated in digital printing (e.g. metallic tones or neon colours). Learn more about printing special colours.
Printing with original Pantone® colours is also possible, but at an additional cost. We will be happy to check your request in terms of quantity and colour and provide you with a corresponding quote.
HPI White/Opaque White
The colour opaque white must be created as a spot colour with the name HPI-White and set to overprint if other colours are to be printed on top of it. If opaque white is set to overprint, it must be above the print layer and below the die cut so that the areas underneath are visible in the print.
Colours in CMYK are not opaque on transparent film or glossy silver paper. In this case, the material shines through. To counteract this, the spot colour HPI-White must also be applied to the entire surface and set to overprint. If white is to be visible as text, these elements must not be set to overprint.
Black
The colour black must be created as 100% black (key) and should not be set to overprint or be glossed with cyan. For a particularly dark black, we also recommend printing double black (double-hit).
Conversion from RGB to CMYK
If you provide us with RGB data, we will convert it to the CMYK colour space without consultation. However, this conversion may result in colour shifts, for which we cannot accept any liability.
Order without Data Check
Under certain circumstances, our graphic designers/media designers may enlarge or reduce the data you have submitted by up to 2 mm. This is done to avoid white flashes or the cutting of content.
Hot Foil Stamping
The embossing area must be created as a spot colour with the name ‘foil’. All hot foil areas must be set to overprint and should have a line thickness of at least 0.2 mm. Recesses within the hot foil elements (internal hot foil/negative spaces) should be at least 0.4 mm. Hot foil stamping is only possible on flat surfaces; gradation is not possible! In our tutorial, we explain step by step how you can easily create hot foil.
Line thickness: min. 0.2 mm
Recesses: min. 0.4 mm
Trimmed frames: min. 2 mm
Other: Very fine details are not compatible with large, full-surface embossing. Very large areas can only be produced to a limited extent, as this may result in gaps in the foil. In this case, we will need to check your print file in detail. Please contact us if you have any questions!
Digital Spot Varnish
With digital partial varnish, also known as spot varnish, selected areas of the printed product are selectively finished with varnish, creating a visual and tactile contrast to the rest of the surface. The area to be finished must be created as a spot colour. All areas finished with spot varnish must be set to overprint and should comply with the minimum thicknesses for lines and recesses.
Line thickness: min. 0,3 mm
Line thickness: min. 0.3 mm
Recesses: min. 0.7 mm
Trimmed frames: Elements that are coated with spot varnish do not adhere and cannot be cut.
Blind Embossing
Blind embossing is a classic finishing technique in label printing. It impresses with a partial, tactile deformation of the label material. The area to be embossed must be created as a spot colour. All areas to be embossed must be set to overprint and should comply with the minimum thicknesses for lines and recesses.
Line thickness: min. 0.4 mm
Recesses: min. 0.6 mm
Trimmed frames/elements: Elements that are finished with blind embossing cannot be cut.
Other: Blind embossing is not compatible with large areas, as the blind embossing ‘sinks’ into large areas and the effect is lost.
Relief Embossing
Relief embossing is a combination of blind embossing and hot foil stamping. The result is a hot foil embossed upwards, which shows off the finished elements to their best advantage. The same applies here: the area to be embossed must be created as a spot colour. All areas to be embossed must be set to overprint and should comply with the minimum thicknesses for lines and recesses.
Line thickness: min. 0.4 mm
Recesses: min. 0.6 mm
Trimmed frames/elements: Trimmed frames/elements are not possible because the elements finished with blind embossing cannot be cut. For areas that are only finished with hot foil (without blind embossing), all trimmed frames must be at least 2 mm thick.
Other: All elements that are to be embossed are also finished with hot foil. However, relief embossing may include elements that are only finished with hot foil (without embossing). Areas that are only finished with hot foil are then flat. The different levels in the label design allow you to achieve great effects.
In order to provide you with the best possible print result, we require your graphic data in PDF format. For more detailed information, please refer to the special page on data delivery. There you will find extensive information on creating print-ready graphic data, including how to correctly create and name die cuts, hot foil and opaque white in your file. Alternatively, you can choose a correction package in our artwork services. What does that mean? We carry out a technical data check and then correct your files. You will receive an error report for checking and a proof for approval by email.
You can create professional print data that meets our requirements using graphics programs such as Adobe Illustrator, InDesign or ArtPro. Our overview above provides you with all the information you need to successfully create your print data: Data delivery.
With our artwork services, you can choose between our Smart (from £30 plus VAT) or Professional (from £65 plus VAT) correction packages, depending on the scope of your project. Our graphics team will then check and correct your print data. You will receive an error report by email for your review and a proof for approval. Go to the artwork services now.
Problems creating the printing file? No problem! With the help of our artwork assistant, a step-by-step guide, you can create an error-free printing file. Simply enter your parameters and data, and you will receive the printing file in Adobe Illustrator format by email. Create a printing file now.
The print data is checked directly during upload. Please note: Our correction packages only refer to suitability for printing and not to spelling mistakes or similar content errors. With our artwork services, you can choose our Smart or Professional correction package. All services and prices for the packages can be found here.
Finishing with additional hot foil will certainly make your label a real eye-catcher! And at label.co.uk, you are spoilt for choice: from classic gold or silver foil to shades of blue and pink to transparent or even black foil.
However, not every material is suitable for hot foil stamping. Hot foil may break away, especially on textured papers such as natural or cotton paper. Our metallic materials, which allow you to simulate metallic effects, are a more cost-effective alternative to classic hot foil stamping.
Another tip for creating the printing file: elements and fonts to be embossed must have a minimum line thickness of 0.2 mm, and empty spaces and negatively recessed elements must be at least 0.4 mm. Please take a look at our tutorial on how to create hot foil correctly. It explains all the important points step by step.
As always, if you have any questions, please do not hesitate to contact our customer service team. We will be happy to advise you!
Correct print data is essential for a smooth ordering and production process. Every printing company has different requirements.
To make it as easy as possible for you to create your print data correctly, we provide you with some helpful tips. This way, you can be sure that your print data is correct and can be processed by us without any problems:
#1 These tips include our information sheet on print data delivery. It summarises all the requirements we have for your printing file as a printing company.
#2 Our checklists also offer assistance: simply download, print out and tick off each step.
#3 In our tutorials, we address important printing topics and explain, for example, how to set up the die cut or opaque white correctly.
If your print data still contains errors, our graphics department will reject the print data during processing and inform you of the reason. You then have the opportunity to make revisions and upload the file again.
Would you like us to take care of your print data? That’s no problem either! Alternatively, you can book our artwork services. Depending on the package you book, we will check and correct your print data.
A distinction is made between the RGB colour space and the CMYK colour space. The RGB colour space is a so-called additive colour space and consists of the colours red, green and blue. RGB colours are also referred to as screen colours or digital colours, as they are mainly used on screens and televisions: The device used generates the different colours and colour intensities using light.
The CMYK colour model is a so-called subtractive colour model and consists of the colours cyan, magenta, yellow and key. All colours can be produced by mixing these four colours.
Please note: The RGB colour space is used for digital products (e.g. websites, social media or apps), while the CMYK colour space is used for print products (e.g. labels, flyers or packaging).
If the colours in your printing file are in RGB, we will automatically convert them to CMYK. This can result in a distorted colour result, and the colours in the print will look different from those on your screen when editing the printing file. Therefore, we ask that you always create your colours in CMYK in the printing file.
A black mark is a black marking on a label that is typically printed on the backing material on the reverse side. This marking allows the processing or labelling machine to recognise where a label begins and ends.
Transparent labels: With transparent labels, the problem is that the optical sensors of the labelling machines cannot distinguish between the backing and the label due to the high light transmission of the material. A black mark remedies this and signals to the machine where the label begins and ends.
Printing a black mark on the back as a black line or small box is no problem for materials with a paper backing. However, with transparent labels with a film backing (such as our PP Clear with PET backing), it is not possible to print on the back.
The reason: Unfortunately, the print does not adhere to a PET carrier and would smudge. If your labels were produced on rolls, the smudged print would then contaminate the front of the next label. As a result, the labelling machine would no longer be able to clearly recognise the black mark and machine dispensing would be virtually impossible. For transparent labels, a so-called insetting web is therefore used.
Printing on the back is not possible on transparent materials with a PET backing. Instead, an insetting web with a black mark is used. An insetting web is an extension of the label, i.e. an extra web with a black mark that is positioned next to the actual label and runs along with it during printing. The insetting can be positioned above or below the label. Important: It is included in the final format and order! The insetting web and black mark remain on the carrier during weeding or labelling.
The type of black mark or insetting web required depends largely on the labelling device. The position, size and number of black marks are entirely individual and always depend on the requirements of the labelling machine and the customer. Some machines and customers require a black mark, while others do not.
The following options are available:
1. Black mark between the web/intermediate cut
2. Black mark at the beginning of the label
3. Black mark at the end of the label
4. Black mark at the beginning and end of the label
Good to know: The black mark does not necessarily have to be printed on the back, but can also be located at the top of the label – if required by your labelling machine.